Adding a metal finish to your home projects can give them a sleek, vintage, or industrial appearance. Whether you’re working on furniture, fixtures, or decorative pieces, achieving a professional-looking DIY metal finish at home is easier than you might think. With the right techniques and materials, you can create a polished, aged, or even distressed metal look without spending a fortune.
In this guide, we’ll walk you through different finishing techniques, essential tools, and expert tips to ensure long-lasting results.
Choosing the Right Metal for Your DIY Project
Before applying a finish, it’s essential to choose the right metal for your project. Some metals naturally develop patina over time, while others require treatments to achieve a desired look.
- Steel – Ideal for industrial-style furniture and fixtures, but prone to rust without a protective coat.
- Aluminum – Lightweight and resistant to corrosion, but requires special primers for finishing.
- Brass & Copper – Develop a beautiful patina naturally but can also be polished for a high-gloss finish.
- Iron – Strong and durable, often used for vintage and rustic designs but needs protection against rust.
If you’re refinishing an existing metal object, start by identifying the material to select the best finishing method.
Essential Tools and Materials for Metal Finishing
To achieve a smooth and even metal finish at home, gather these essential tools and supplies:
- Sandpaper (various grits)
- Wire brushes or steel wool
- Chemical degreasers or vinegar for cleaning
- Primer (for non-ferrous metals like aluminum)
- Spray paint or metal-specific paints
- Sealers or wax coatings for protection
- Gloves and safety goggles for protection
With these materials ready, you can confidently move on to different metal finishing techniques.
Brushed Metal Finish: A Sleek Industrial Look
A brushed metal finish gives surfaces a soft, satin-like appearance, commonly found in stainless steel appliances.
How to Achieve a Brushed Metal Finish:
- Clean the Surface – Remove any grease or dirt using a degreaser or vinegar solution.
- Sand in One Direction – Use medium-grit sandpaper (180-220) to create uniform, linear scratches.
- Polish with Fine Grit – Follow up with fine-grit sandpaper (400-600) for a smoother look.
- Seal the Finish – Apply a clear metal sealer to prevent oxidation and enhance durability.
This method is great for kitchen fixtures, furniture accents, and DIY home decor pieces.
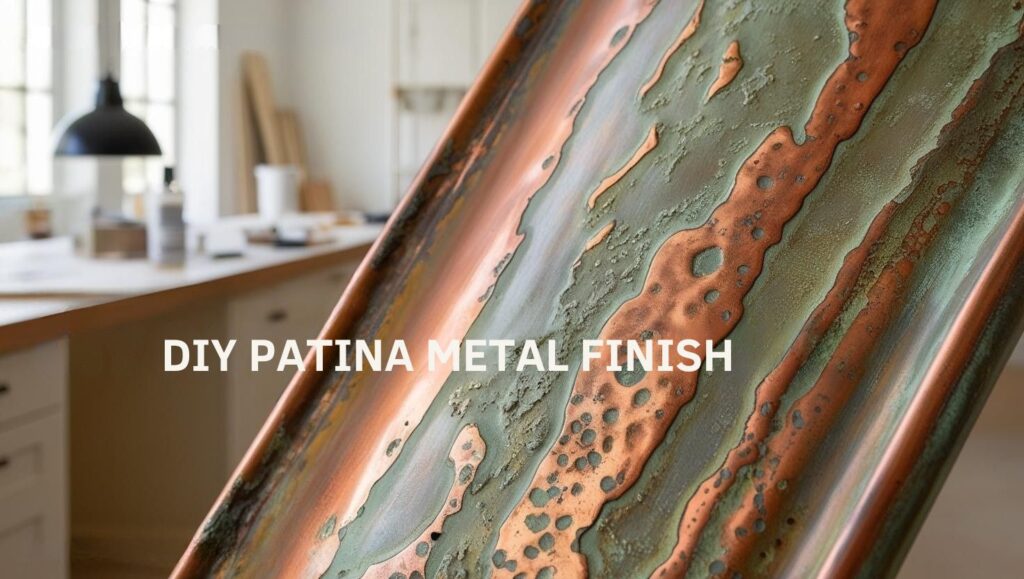
Aged & Patina Metal Finish: Vintage and Rustic Appeal
If you love the rustic charm of aged metal, you can create a patina effect using household items like vinegar, salt, and ammonia.
DIY Patina Finish Process:
- Prepare the Metal – Clean it thoroughly to remove oils and debris.
- Apply an Oxidizing Solution – Mix vinegar and salt or use a commercial patina solution.
- Let It React – Leave the solution on the metal for several hours to develop natural oxidation.
- Seal the Patina – Once you achieve the desired aged look, apply a clear wax or lacquer to preserve it.
This method works best on copper, brass, and steel, giving a weathered, antique appearance.
Polished Metal Finish: A High-Gloss, Mirror-Like Effect
For a modern, luxurious look, a polished metal finish is the way to go. This technique is commonly used for decorative pieces, tabletops, and lighting fixtures.
Steps for a Mirror-Polished Finish:
- Start with Coarse Sanding – Use 220-grit sandpaper to smooth out any rough areas.
- Progress to Higher Grits – Continue sanding with 400, 800, and then 1000+ grit for an ultra-smooth surface.
- Use a Polishing Compound – Apply a metal polishing paste and buff using a microfiber cloth or polishing wheel.
- Finish with a Protective Coat – Use a clear lacquer to maintain the shine and prevent tarnishing.
This method is ideal for metal decor, countertops, and modern home fixtures.

Protecting Your DIY Metal Finish for Long-Lasting Results
Once you’ve achieved your desired finish, protecting it is key to maintaining its appearance over time.
Tips for Preserving Your Metal Finish:
- Use a Clear Sealant – Choose a spray lacquer or wax finish to prevent rust and oxidation.
- Regular Maintenance – Clean metal surfaces with a mild soap solution and avoid abrasive cleaners.
- Reapply Protective Coats – Over time, metal finishes may fade; reapply sealants or polish as needed.
Following these steps will ensure your DIY metal finish remains beautiful and durable for years.

Final Thoughts: Elevate Your Home Projects with DIY Metal Finishing
With the right techniques, achieving a DIY metal finish at home can transform your home projects from ordinary to extraordinary. Whether you prefer a brushed, aged, or polished look, these finishing methods allow you to customize metal pieces to match your style.
Try these techniques on furniture, decor, and fixtures to create a professional, long-lasting metal finish without breaking the bank! Happy DIY-ing! 🚀